Introduction
As a new project manager, one of your core tasks is the creation of new projects. In this blog post, we’ll walk you through this essential process, providing you with practical tips to ensure your projects get off to a strong start.
Before we begin this guide, we must define what a resource management system is. A resource management system is software designed to manage resources within an organization. These resources could include personnel, equipment, materials, time, and budget.
Understanding the Importance of Project Creation
Effective project creation is the foundation of successful project management. It is the first step in the project lifecycle, setting the stage for the entire project. Here’s why it’s crucial:
-
Clarity and Focus: Defining project details, objectives, and expected outcomes helps your team understand what needs to be done and why it matters.
-
Resource Allocation: The resource management system relies on accurate project information to allocate resources effectively.
-
Risk Mitigation: A well-defined project plan can help you identify potential risks and plan accordingly.
-
Communication: Project creation serves as a communication tool to convey the project’s purpose, scope, and goals to all stakeholders.
Let’s break down the steps for creating a new project:
Step 1: Define Project Details
The first step in creating a new project is defining its details. This includes1:
-
Project Name: Choose a clear and concise name that reflects the project’s purpose. Avoid using vague or ambiguous titles.
-
Project Description: Write a comprehensive description of the project. It should answer the questions: What is the project about? Why is it necessary?
-
Scope: Clearly outline what the project will and will not cover. Be as specific as possible to avoid scope creep.
-
Project Timeline: Set a timeline that includes start and end dates. Create a project schedule that breaks down key milestones and tasks.
-
Budget: Establish a budget for the project, taking into account all necessary resources, such as personnel, materials, and equipment.
-
Team Members2: Identify the team members who will be involved in the project, along with their roles and responsibilities.
Step 2: Define Objectives
 Graphic courtesy of Hygger
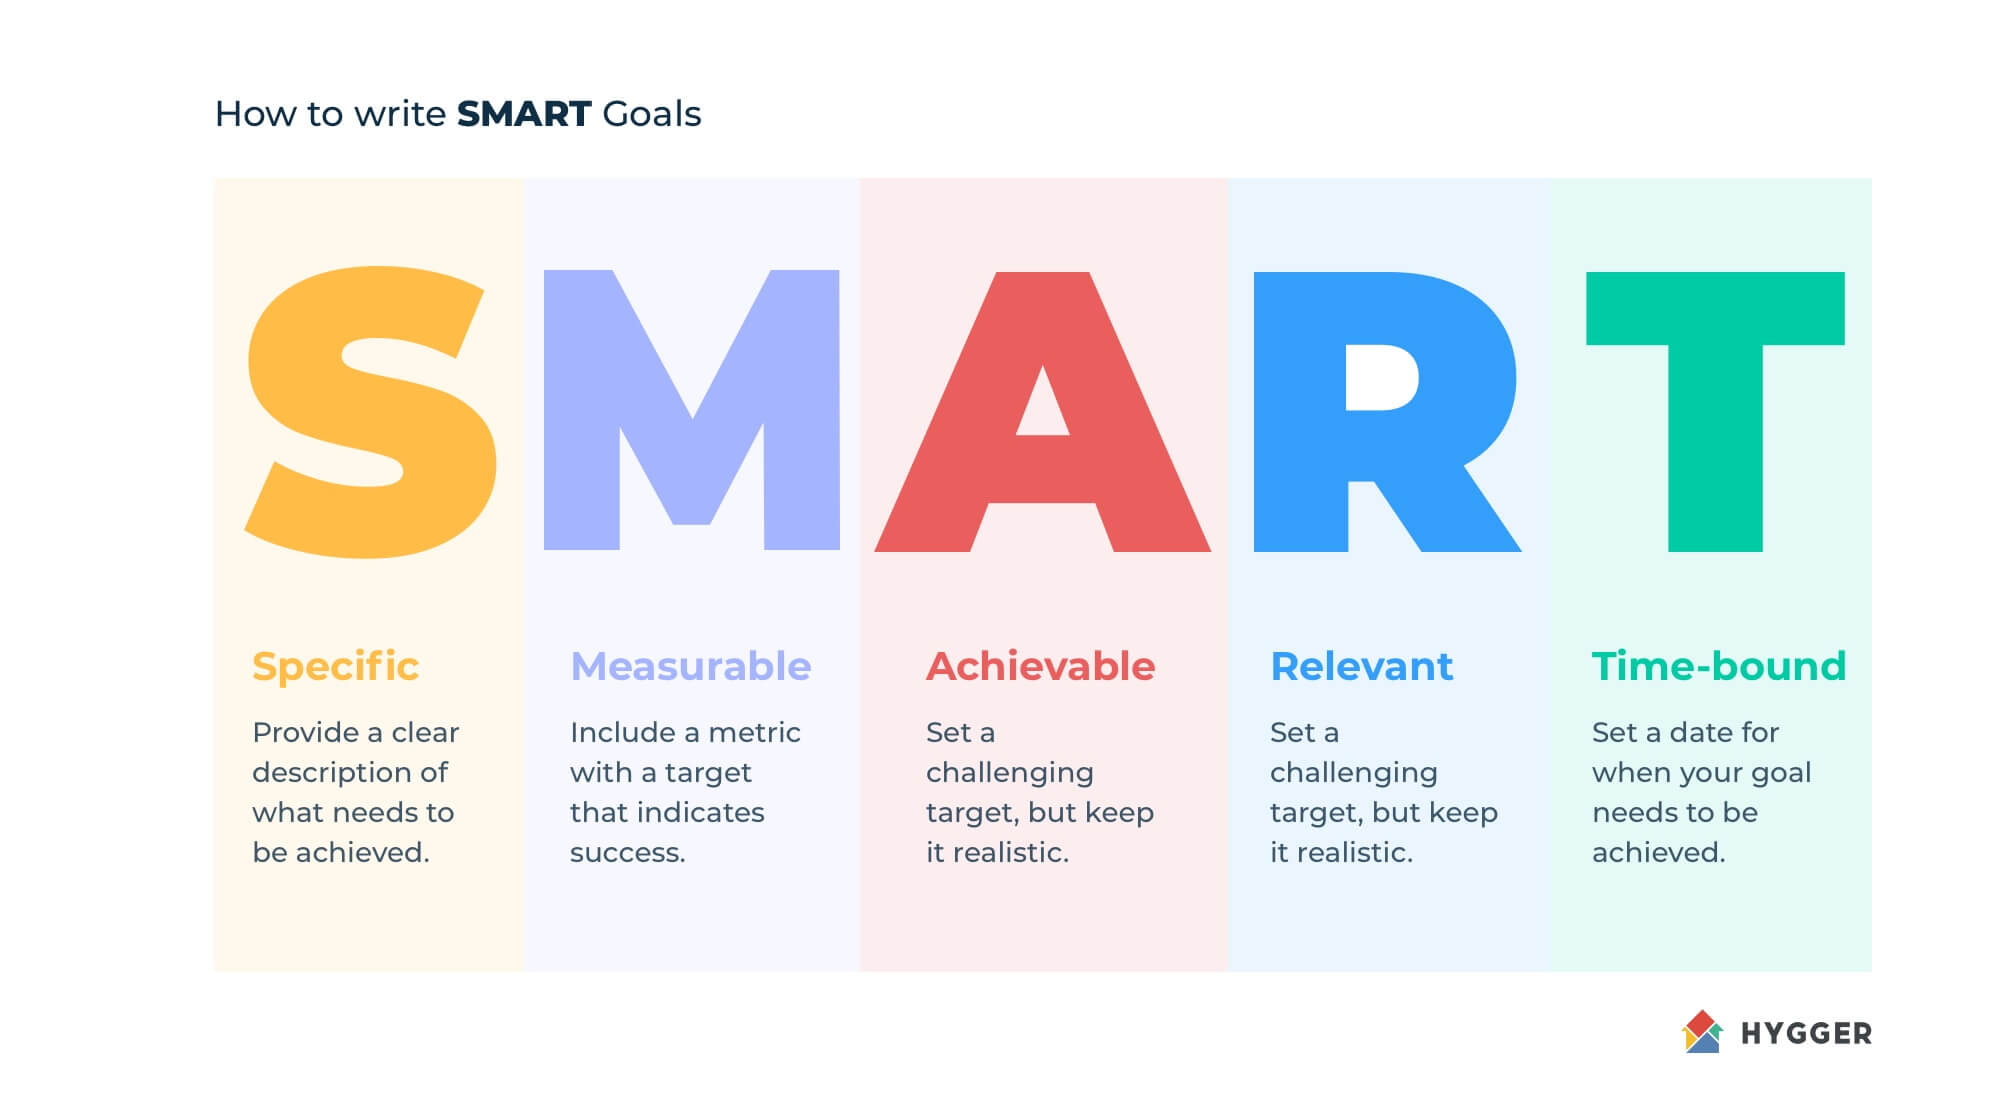
Project objectives are the desired outcomes that the project aims to achieve. They should be SMART (Specific, Measurable, Achievable, Relevant, and Time-bound)3:
-
Specific: Be precise about what you want to accomplish.
-
Measurable: Determine how you will measure the success of each objective.
-
Achievable: Ensure that the objectives are realistic and attainable given the available resources.
-
Relevant: Align the objectives with the project’s purpose and overall business goals.
-
Time-bound: Set a clear timeframe for achieving each objective.
Step 3: Specify Expected Outcomes
Expected outcomes are the results or benefits that the project is expected to deliver. These outcomes should directly link to the project objectives. Specify what you expect to achieve once the project is completed. This could include:
-
Deliverables: List the tangible items or work products that the project will produce.
-
Benefits: Describe the positive impacts the project will have on the organization or stakeholders.
Step 4: Communicate the Project
Effective communication is essential for a successful project. Make sure to inform your team, stakeholders, and relevant parties about the newly created project. Use the resource management system to facilitate this communication by:
-
Document Sharing: Upload relevant project documents and files to the system, making them easily accessible to everyone involved.
-
Collaboration Tools: Utilize collaboration features within the resource management system to foster communication and collaboration among team members.
-
Regular Updates: Keep all stakeholders informed about the project’s progress by providing regular updates and reports through the system.
Step 5: Monitor and Adjust
 Graphic courtesy of ProjectManager
Creating a project is just the beginning. As a project manager, it’s your responsibility to monitor the project’s progress and make adjustments as needed. The resource management system will be your tool for:
-
Tracking Progress: Monitor the project’s progress, keeping an eye on milestones and deadlines.
-
Resource Allocation: Ensure that resources are allocated as planned, and make adjustments if necessary.
-
Risk Management: Continuously assess potential risks and take preventive measures as needed.
-
Report Generation: Generate reports from the resource management system to provide insight into the project’s status and performance.
-
Iterate and Improve: Learn from each project’s experience, and use the insights to improve your project creation and management processes.
Conclusion
For any project manager, the ability to initiate a new project within a resource management system is essential. You create the conditions for a successful project by carefully outlining the goals, objectives, and expected results. In this process, keep in mind that the resource management system is your ally since it makes monitoring, resource allocation, and communication more effective.
Gaining proficiency in project creation as a project manager will enable you to successfully lead your team, complete projects on time, and add to the overall success of your company. If you follow the guidelines in this guide, you will be well on your way to becoming a competent and self-assured project manager.
Resources
Banner image courtesy of DeskTime
-
“Project Plan Guide: 6 Steps to Foolproof Project Planning” (https://www.wrike.com/blog/foolproof-project-plan/) ↩
-
”What Is Project Resource Management? And Why Bother? - Ganttic” (https://www.ganttic.com/blog/what-is-resource-management) ↩
-
“What Is SMART in Project Management? (wrike.com)” (https://www.wrike.com/project-management-guide/faq/what-is-smart-in-project-management/) ↩